17 Steps to Installing your Round Above Ground Swimming Pool

An interactive guide for installing your above ground swimming pool!

ABOVE GROUND POOL SAFETY: READ BEFORE INSTALLATION 

Step 6 - 5


FAILURE TO HEED THESE WARNINGS CAN RESULT IN PERMANENT INJURY, PARALYSIS FROM A BROKEN NECK, ELECTROCUTION OR DROWNING. THIS POOL IS NOT DESIGNED FOR DIVING OR JUMPING! DANGEROUS INJURY CAN RESULT, SHALLOW WATER! 


INSTALLATION CAUTIONS:  

There are several situations that could cause your pool to malfunction if not taken into consideration and planned for prior to installing your pool. Are you installing the pool in the grade or near a slope/hill? Are you prepared with drainage options and understand backfilling and leveling? We cover all these and more here. 
Read thoroughly before beginning.


BEFORE YOU BEGIN: 

Congratulations on becoming the owner of a new above-ground swimming pool! This is a general guide of useful information as it pertains to your swimming pool’s installation. Each section below sums up the step you need to take with a link to that step's full instructions in our Learning Hub.

Your swimming pool came with the manufacturer’s installation manual as well. Always follow the manufacturer’s installation instructions as to not void your warranty. The below information is meant to serve as a more in-depth guide that will cover some installation guidance sometimes left out of the owner’s manual. Always refer to your owner’s manual first.

The following are some helpful hints that you should take into consideration before installing your pool.

  1. READ THROUGH THE ENTIRE INSTRUCTION BOOKLET THAT CAME WITH YOUR POOL BEFORE YOU BEGIN. This will enable you to find out exactly what is involved with installing your swimming pool before you begin. While you are going through the instructions, please be aware that all of the diagrams are representative of a 15' x 30'/18' x 33' pool. If you have a different size pool you will find that your pool has a different number of uprights than the ones in the diagrams.
  2. DO NOT ATTEMPT INSTALLATION IN WINDY OR GUSTY WEATHER. This will not only make installation more difficult, but it may also result in damage to your pool before it is completely installed.
  3. REVIEW ALL SAFETY MATERIAL AND LOCAL CODES BEFORE BEGINNING YOUR INSTALLATION. There is a yellow safety envelope packed with your pool. This envelope contains safety material and warning stickers to be placed on your pool. If you are missing any of these items please contact your dealer or the factory to obtain it. The warranty is void if all safety precautions are not followed.
  4. Although we have broken down the installation into many simple steps, you will probably find that the first few steps will be the most labor intensive and time-consuming steps. Once you have completed the initial steps you should find that the rest of the installation moves along much more quickly.
  5. If you need to make a warranty claim, it is important to know the size and model of your swimming pool to expedite the handling of your claim. Please fill in the information below and keep for your records. All of this information can be found on the labels attached to the cartons your pool is packed in.
    • ORDER NUMBER:
    • POOL MODEL NAME:­­­­­­­­­­­­­­­­­­­­­­­­­­­
    • POOL SIZE:
    • DATE OF PURCHASE:
    • LINER BRAND AND PATTERN NAME :
Make sure you have completed your inventory checklist and have the necessary tools before beginning your installation!

Installing an above ground pool can be done quickly if you’re prepared beforehand. Below is a list of the tools and materials needed.

  • Shovel
  • Broom
  • Rake
  • Tape Measure (Roll Tape)
  • Phillips Head Screwdriver
  • Duct Tape
  • Sand
  • Carpenters Level and/or Transit
  • Patio Block (12” x 12” x 1”)
  • Box Cutter (Razor Blade)
  • Tamp
  • 5/16” Wrench
  • 1/4” Wrench
  • Stakes
  • Rebar


STEP 1: DETERMINING THE PROPER POOL SIZE AND LOCATION

While this step was most likely done before purchasing your pool, if for any reason you did not complete it beforehand you must do so before you start opening the boxes containing your pool’s parts.

  1. Look up your local county's swimming pool codes to determine how much space you need to have between your pool and your property line.
  2. Determine where your pool will go in your yard.
  3. Mark the entire Pool Area Dimensions (Pool Radius Plus One (1) Foot) to determine if you have enough space for the pool size you’ve selected. (See pool dimensions in the full instructions)

Click here for Step 1's full instructions


STEP 2: INVENTORY CHECK

Once you have successfully received all pieces, boxes, and/or pallets for your pool, before you start building, complete all inventory checklists provided. This will help ensure you do not have to stop the building process because something is not there, which can be costly if you’ve hired a builder or the weather undoes your work.

Click here for Step 2's full instructions.


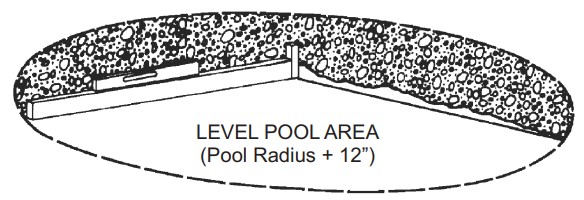
STEP 3: PREPARE THE POOL SITE

A level pool site is a vital part of your pool construction. Avoid possible disassembly later by taking your time and making sure the pool area is leveled properly.

Click here for Step 3's full 4-step instructions here.  If installing a pool with a deeper end using an expandable liner, see appendix B here.  

PREPARE THE POOL SITE


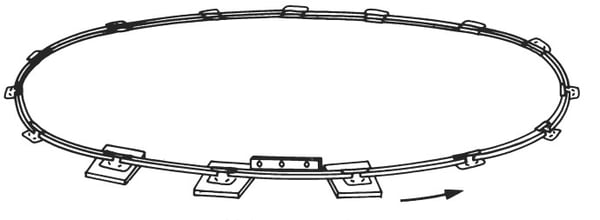
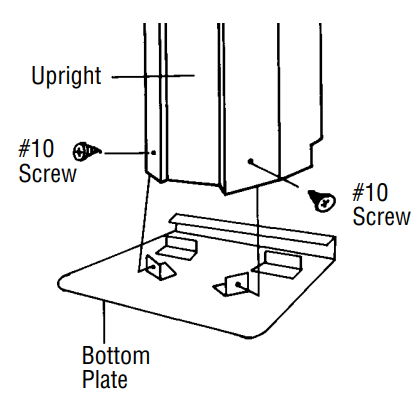
STEP 4: BOTTOM WALL RIM ASSEMBLY  

Depending on your pool brand and model, the Bottom Plates may be called Base Plates, Bottom or Base Cuffs, or Vertical End Caps. For this guide, we’ll use the term Bottom Plate. Make sure you are using the bottom rails and not the inner stabilizer bars. The stabilizer bars are always metal and they have a male end and a female end.

Click here for Step 4's full 4-step instructions.How to Assemble your Above Ground Pool's Bottom Wall and Rim


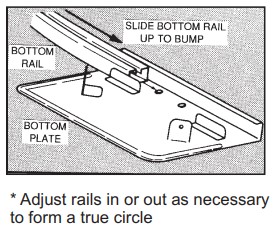
STEP 5: PATIO BLOCK INSTALLATION

For added support, each Bottom Plate will have a patio block centered in the ground under it. Once the rim of your pool is in position, you can now tell where each of the 12”x 12”x 1” patio blocks need to go. Make sure that the top of the block is the only part of the block that can be seen and that it is flush with the top of the ground. Level the block in all directions (side to side as well as front to back).

Click here for Step 5's full instructions here including pro tips and installation warnings.

How to Install your Above Ground Pool's using Patio Blocks


STEP 6: PRE-ASSEMBLY

Start the pre-assembly of the uprights. On most models, the top of the uprights can be identified by either having an extra hole in the middle or by an extra hole on each side (depending on which pool you have) for the decorator caps.

Click here for Step 6's full 3-step instructions.

How to Pre-Assemble your Above Ground Pool during Installation


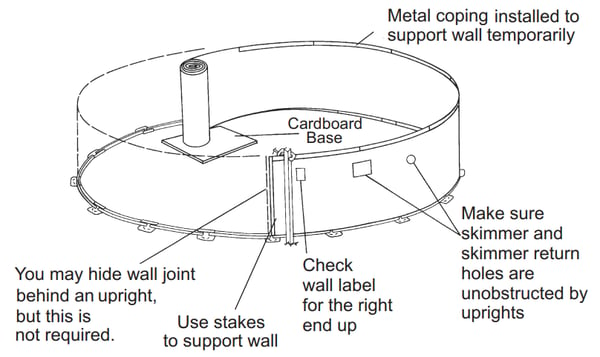
STEP 7: WALL INSTALLATION

WARNING!  DO NOT ATTEMPT THE NEXT STEP IN WINDY CONDITIONS!

The wall should either have “Up” arrows or a label to indicate which end of the wall is the top versus the bottom. This matters as your skimmer opening(s) have to be on the upper portion of the wall. If your wall is installed upside down you will have to undo your work and start over. Make sure the wall is right-side-up prior to moving forward.

Click here for Step 7's full 2-step instructions.

How to Install your Above Ground Pool Wall


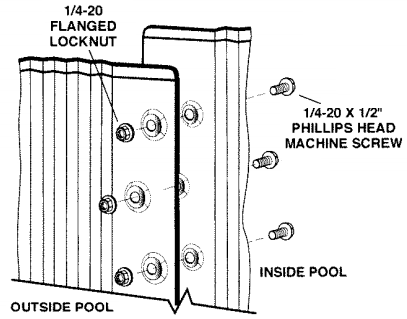
STEP 8: WALL JOINT ASSEMBLY

Bring the ends of the pool wall together and overlap them. The raised feature on one end of the wall will be received by the corresponding facing recess on the other end of the wall. Place the grooves at the end of the walls together so they are flush.

Click here for Step 8's full 5-step instructions including troubleshooting if your walls overlap or have a gap.

How to Assembly your Above Ground Pool Wall Joints


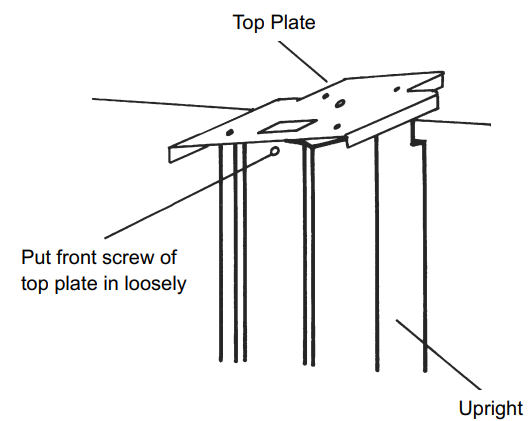
STEP 9: VERTICAL SUPPORT INSTALLATION

 If you have not done so already, install your fence post holders or deck support system before installing the vertical support (also known as uprights) onto the Bottom Plates.

Click here for Step 9's full instructions.

How to Assembly your Above Ground Pool Vertical Supports


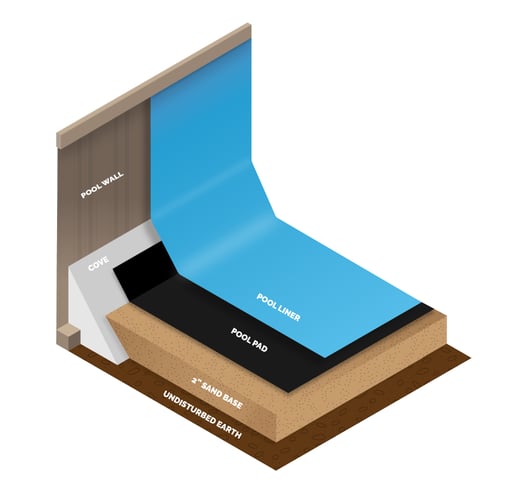
STEP 10: BUILDING YOUR POOL’S FOUNDATION

The order of your pool’s foundation will be Undisturbed Earth, Cove, Sand Base, Pool Pad (if using one), and Liner in that specific order.

Click here for Step 10's full instructions on each layer.

How to Build your Above Ground Pool Foundation


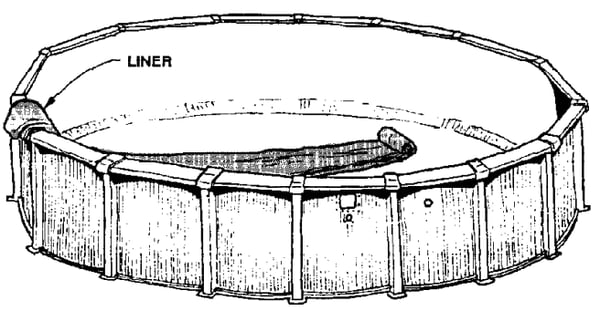
STEP 11: LINER INSTALLATION

IMPORTANT! Before opening your liner box, check the label! Confirm that the liner is the proper size and pattern. If it is incorrect, DO NOT open the box. Contact your supplier immediately.

Click here for Step 11's full instructions, including specific instructions for overlap, beaded, and uni-bead liners

How to Install your Above Ground Pool Liner


STEP 12: LINER ADJUSTMENT

Once the liner is securely in place by either the coping, bead, or J-hook, temporarily pull any wrinkles in the floor towards the side wall evenly, leaving the wrinkles at the cove.

Click here for Step 12's full instructions, including ship vac instructions and pro tips.


STEP 13: STABILIZER RAILS

When the liner is completely adjusted (and if an overlap liner, the plastic coping is secured), push the first stabilizer rail over the plastic coping or pool wall so that it fits snugly (starting at the wall bolts is usually a good idea). Leave one end of the stabilizer slightly raised so that the next stabilizer can interlock. Depending on your pool’s brand, you may have alternating stabilizer rail sizes. As the stabilizers are installed progressively around the circumference of the pool, note that the tapered end of the stabilizer easily slides into the untapered end of the following stabilizer. The tapered end should be inserted approximately 1" into the next stabilizer.

Click here for Step 13's full instructions.


STEP 14: ADDING WATER & INSTALLING POOL ACCESSORIES

If you plan to use a garden hose to add water to the pool, check the metal nozzle to make sure there are no sharp edges that could damage your liner. If so, file them down or cover them with duct tape prior to adding the hose to your pool.

Click here for Step 14's full instructions including specific instructions for different skimmer brands.


STEP 15: SECURE VERTICAL SUPPORTS 

Use a carpenter’s level to check that the upright is standing perfectly straight. If the uprights are not level, it will be very difficult to get the top ledge rails to fit together. If the upright is leaning left or right correct it before moving on.

Click here for Step 15's full Instructions.


How to secure the vertical supports on your Above ground swimming pool


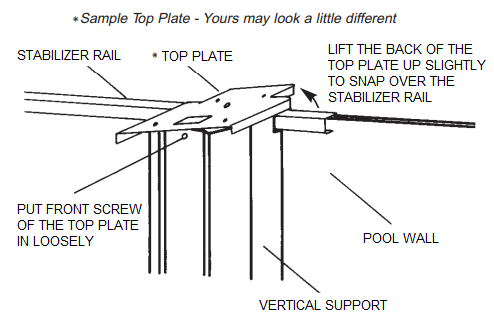
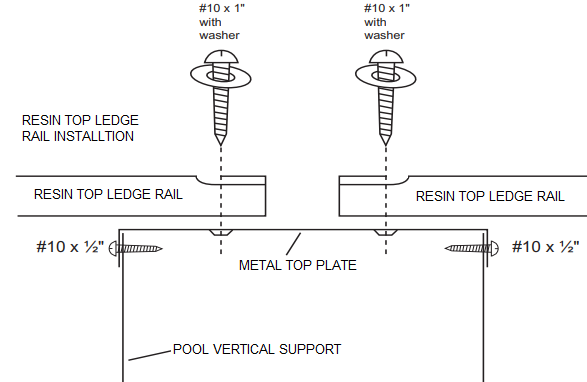
STEP 16: INSTALL TOP LEDGE RAILS

Top ledge rails can either be metal or resin. Resin Top Ledge Rails require special screws that have attached washers in order to attach the resin top rail to the metal top plate. When installing the top ledge rails do not tighten screws until all top ledge rails have been installed.

Click here for Step 16's full instructions.

How to Install the Top Ledge Rails on your Above Ground Pool


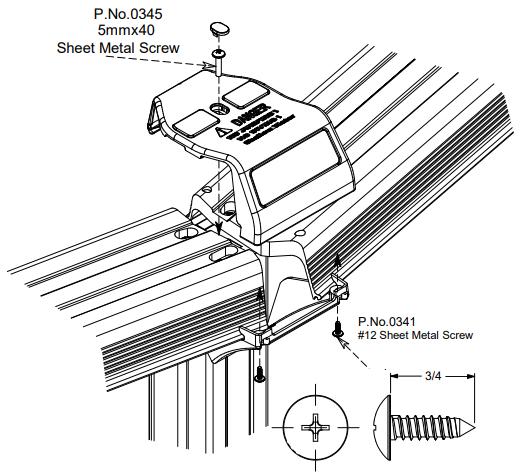
STEP 17: TOP COVER CONNECTOR INSTALLATION

After all top ledge rails have been installed, tighten all screws and attach the top cover connectors. Depending on your pool model, you may have 1- or 2-piece top cover connectors. If you have a 2-piece top cover connector, the style can vary based on model.

Click here for Step 17's full instructions. 

TOP COVER CONNECTOR INSTALLATION


IMPORTANT POOL SAFETY & MAINTENANCE

  • Keep your pool wall and frame clean. Always wash away any deposits of pool chemicals which land on the frame of your pool. Wash periodically with a mild soap solution (no abrasives).
  • Your pool and liner must be inspected regularly for leaks, corrosion, scratches, and punctures. If any problem is found IMMEDIATE CORRECTIVE ACTION MUST BE TAKEN. Small repairs and punctures in your liner may be easily repaired using liner repair kits.
  • Scratches on your pool wall & frame must be touched up with anti-rust enamel. Wire brush all rust and add a coat of enamel primer followed by a coat of color matching paint.
  • Pool water is full of various caustic chemicals, which will corrode metal parts. If any corrosion is allowed to continue, failure of the pool structure may occur which could result in excessive property damage as well as bodily harm
  • The skimmer/skimmer return gaskets must be replaced when they become defective. Water must not be permitted to continually run down the wall. If neglected, the pool will break. If proper skimmer/skimmer return gasket care is not maintained, your warranty will be void
  • SEE MORE SAFETY AND MAINTENANCE INFORMATION HERE


WINTERIZING YOUR POOL

During the winter, your pool is subject to more stress than in the summer, and any breakage that is caused by incorrect winterization will not be covered by warranty.

Before closing down your pool for the winter you must make a complete inspection of the pool.

  • Check all the connections to make sure everything is tight and in good condition
  • Check to see that the liner is snugly held in place over the wall
  • Check for any indication of rust or deterioration in any part

See full instructions here.


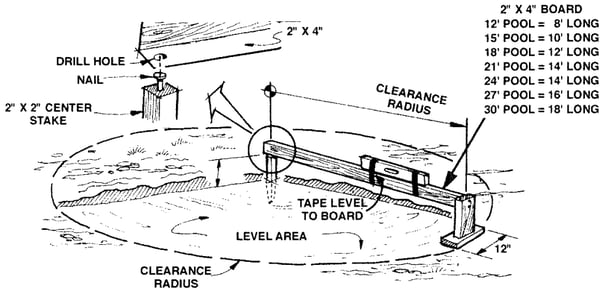
APPENDIX A: HOMEMADE LEVELING DEVICE

Use the instructions found here to make a leveling device or use a long enough straight board and carpenter’s level on their own.

DIY  LEVELING DEVICE


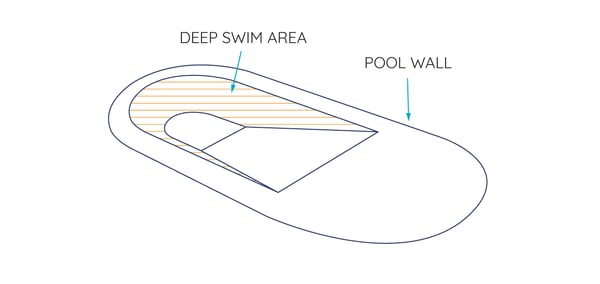
APPENDIX B: OPTIONAL DEEP SWIMMING AREA

See instructions for installing an above ground pool with a deeper end by choosing your pool's shape below: 
Oval Deep End Swim Area - angle@2x


APPENDIX C: DECK OR FENCE POST HOLDERS INSTALLATION

IMPORTANT! If you are installing a fence or deck on your pool, you will need to install post holders or deck support system on your uprights BEFORE you install the upright in the pool. Refer to your Fence Installation Instructions for full details. See full instructions here.


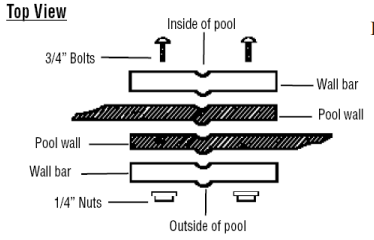
APPENDIX D: WILBAR WALL JOINT & WALL BAR ASSEMBLY

There are two different common kinds of wall bars. One has a single row of bolts with wall bars, and the other is a staggered double row pattern with wall bars. The installation is the same regardless of the wall bar type. See full instructions here. 

How to Assemble Wilbar Wall Joint & Wall Bars


APPENDIX E: WILBAR STAINLESS STEEL WALL SAVER PANEL

Select Wilbar pool models (like our Saltwater Ultimate) come with a Stainless-Steel Wall-Saver Panel. The Wall-Saver Panel is a separate piece of the pool wall that has the skimmer and return openings in it. The Wall-Saver Panel is joined to the pool at each end of the wall to close the circle of your pool’s perimeter. If your pool model has this panel type, your pool will have 2 wall joints instead of one.  See full instructions here

How to Install a Wilbar Stainless Steel Wall-Saver Panel